Introducing a comprehensive guide to tackle the frustrating issue of Windows 10 mouse right-click not working. Explore 19 ingenious solutions that will help you regain control and navigate your PC effortlessly.
Check for hardware issues
If your Windows 10 mouse right click is not working, it could be due to hardware issues. Here are some steps to troubleshoot:
1. Check the connections: Ensure that your mouse is properly connected to the computer. If you’re using a wireless mouse, make sure the batteries are not running low.
2. Test on another computer: Connect the mouse to another computer to see if the issue persists. If it works fine on another computer, the problem may be with your current system.
3. Check USB port: Try plugging the mouse into a different USB port on your computer. Sometimes, the port may be causing the problem.
4. Update mouse driver: Press Windows+X and select “Device Manager.” Expand “Mice and other pointing devices” and right-click on your mouse device. Select “Update driver” to ensure you have the latest driver installed.
5. Run DISM: Press Windows+X and select “Command Prompt (Admin).” Type “dism /online /cleanup-image /restorehealth” and press Enter. This will fix any system image issues that may be affecting your mouse.
By following these steps, you can identify and resolve any hardware issues that may be causing your Windows 10 mouse right click problem.
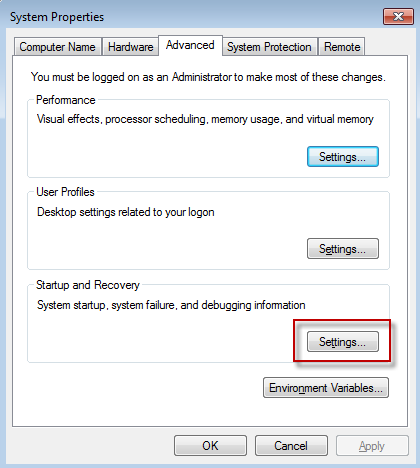
Change power management settings for USB Root Hub
To change power management settings for USB Root Hub, follow these steps:
1. Press Windows key + X to open the Power User menu and select Device Manager.
2. Expand the Universal Serial Bus controllers category.
3. Right-click on USB Root Hub and select Properties.
4. In the Properties window, go to the Power Management tab.
5. Uncheck the box that says Allow the computer to turn off this device to save power.
6. Click OK to save the changes.
This solution can help fix issues where the right-click on your mouse or touchpad is not working, particularly with context menus in Windows Explorer or File Explorer. Disabling power management settings for the USB Root Hub can prevent interruptions to the peripheral devices connected to your computer, ensuring their smooth functioning.
Note: If the issue persists, try other solutions from the list of 19 solutions provided in the article, as various factors can contribute to this trouble.
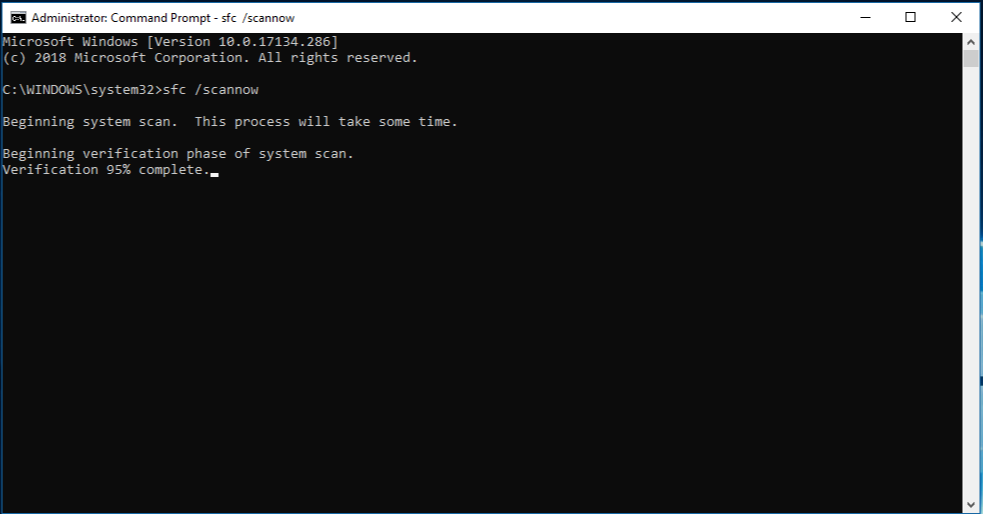
Run DISM
If you’re experiencing issues with your mouse right-click not working on Windows 10, one possible solution is to run the DISM (Deployment Imaging and Servicing Management) tool.
– Open the Start menu and type “Command Prompt” in the search bar.
– Right-click on the Command Prompt app and select “Run as administrator.”
– In the Command Prompt window, type “dism /online /cleanup-image /restorehealth” and press Enter.
– Wait for the process to complete. This may take some time.
– Once the process finishes, restart your computer and check if the right-click functionality has been restored.
Running DISM can help fix any corrupted system files that may be causing the issue with your mouse right-click. If this solution doesn’t work, you can try other troubleshooting tips or consider reaching out to Microsoft support for further assistance.
Update your mouse driver
Fix 1: Update Your Mouse Driver
If your mouse right click is not working in Windows 10, it could be due to an outdated or corrupted mouse driver. To fix this issue, follow these steps:
1. Press the Windows key + X and select “Device Manager” from the menu.
2. Expand the “Mice and other pointing devices” category.
3. Right-click on your mouse device and select “Update driver.”
4. Choose the option to automatically search for updated driver software.
5. Wait for the process to complete and then restart your computer.
Updating your mouse driver can often resolve issues with the right-click functionality. If this doesn’t work, you can try other solutions from our list of 19 fixes for Windows 10 mouse right-click not working. These solutions cover a range of factors, including troubleshooting tips, disabling touchpads, fixing contextual menus, and more.
Remember, if you’re using a laptop with a touchpad, you may need to disable the touchpad or adjust its settings to prevent any conflicts.
Turn off the Tablet mode
To turn off Tablet mode on Windows 10 and fix the issue of the mouse right-click not working, follow these steps:
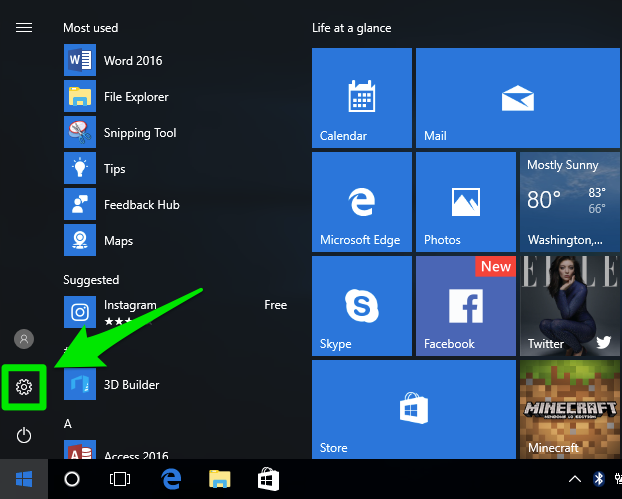
1. On your desktop or laptop, go to the Start menu and click on the Settings icon.
2. In the Settings window, select the “System” option.
3. In the left-hand menu, click on “Tablet mode”.
4. Under the “When I sign in” section, choose the “Use desktop mode” option.
5. Close the Settings window.
If you are using a peripheral mouse, try the following fixes:
1. Update the mouse driver software by going to the manufacturer’s website.
2. Check for any physical issues with the mouse or its connection.
3. Restart your computer and see if the issue persists.
4. Use a different USB port or try a different mouse.
If the problem still persists, you can try other troubleshooting methods like creating a system image or using the Task Manager to end any processes related to the mouse.
For more detailed instructions and additional solutions, you can refer to articles or videos on websites like YouTube or MiniTool.
Restart Windows Explorer and check Group Policy’s settings
To restart Windows Explorer and check Group Policy’s settings, follow these steps:
1. Press Ctrl + Shift + Esc to open the Task Manager.
2. In the Task Manager, click on the Processes tab.
3. Scroll down and find Windows Explorer in the list of processes.
4. Right-click on Windows Explorer and choose Restart from the context menu.
5. Close the Task Manager.
Next, let’s check the Group Policy settings:
1. Press Windows key + R to open the Run dialog box.
2. Type gpedit.msc and press Enter to open the Group Policy Editor.
3. In the Group Policy Editor, navigate to User Configuration > Administrative Templates > Start Menu and Taskbar.
4. Look for any policies related to the right-click context menu or mouse settings.
5. If any policies are enabled, double-click on them and set them to Not Configured or Disabled.
6. Close the Group Policy Editor.
By restarting Windows Explorer and checking Group Policy settings, you may be able to resolve the issue of the right-click not working on your Windows 10 mouse.
Restart File Explorer
If you’re experiencing issues with your right-click function on your Windows 10 mouse, here are 19 solutions to try.
1. Restart File Explorer: Press Ctrl + Shift + Esc to open Task Manager, go to the Processes tab, find “Windows Explorer,” right-click it, and select Restart.
2. Check for mouse driver updates: Go to the manufacturer’s website or use a driver update tool like MiniTool to ensure you have the latest driver installed.
3. Switch primary mouse button: Go to Settings > Devices > Mouse and switch the primary button to the right if it’s currently set to the left.
4. Use the keyboard: If your mouse is completely unresponsive, use the Tab key to navigate and the Enter key to select options.
5. Disable laptop touchpad: On laptops, try disabling the touchpad temporarily to see if that resolves the issue.
Remember to test each solution to find the one that works best for you. For more detailed instructions, you can refer to online resources like YouTube tutorials or relevant articles.
Disconnect/Reconnect Mouse
To disconnect and reconnect your mouse on Windows 10, follow these steps:
1. Disconnect the mouse from your computer by either unplugging the USB receiver or turning off the Bluetooth connection.
2. Wait for a few seconds and then reconnect the mouse by plugging in the USB receiver or turning on the Bluetooth connection.
3. If the right-click still isn’t working, try the following solutions:
– Fix 1: Restart your computer.
– Fix 2: Update your mouse driver.
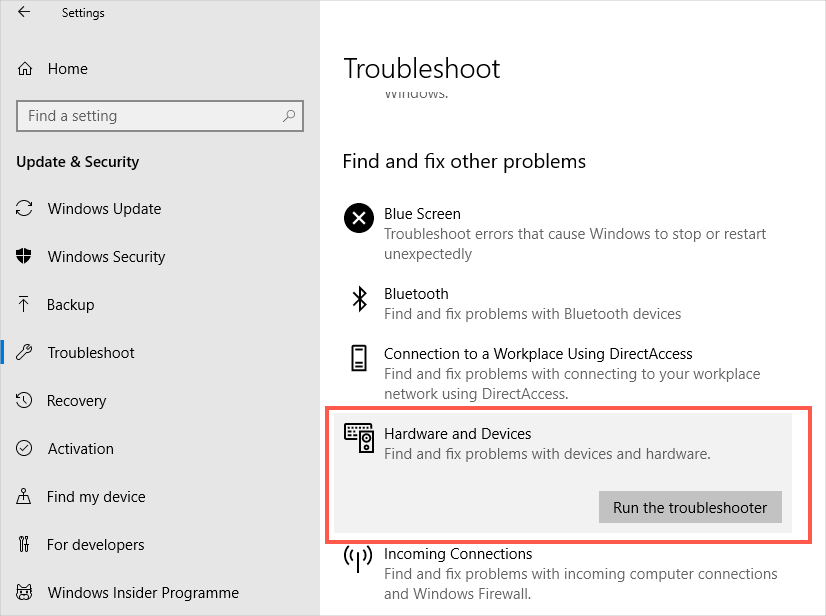
– Fix 3: Run the Hardware and Devices troubleshooter.
– Fix 4: Check for any third-party software conflicts.
– Fix 5: Disable Tablet Mode.
– Fix 6: Adjust the mouse settings.
– Fix 7: Check for any pending Windows updates.
If none of these solutions help, try using a different mouse or connecting your current mouse to a different USB port.
Check Mouse Settings
- Restart your computer: Sometimes a simple restart can resolve mouse issues.
- Check for Windows updates: Ensure your operating system is up to date to fix any known bugs or issues.
- Update mouse drivers: Visit the manufacturer’s website or use Device Manager to update your mouse drivers.
- Run the Hardware and Devices troubleshooter: Use this built-in tool to automatically detect and fix mouse-related problems.
- Perform a System File Checker (SFC) scan: This command-line tool checks for corrupted system files that may be causing the issue.
- Disable mouse acceleration: Adjust mouse settings in the Control Panel to disable acceleration and improve mouse precision.
- Check mouse settings in the Control Panel: Ensure the right-click function is enabled and properly configured.
- Try a different USB port: Connect your mouse to a different port to rule out any issues with the current one.
- Test the mouse on another computer: Verify if the problem persists when using the mouse on a different computer.
- Run a malware scan: Use reliable security software to check for any malware interfering with your mouse functionality.
- Disable unnecessary mouse-related software: Temporarily disable any third-party mouse software to check for conflicts.
- Check power management settings: Adjust power settings to prevent the mouse from being turned off to save power.
- Perform a clean boot: Disable non-essential startup programs and services to troubleshoot software conflicts.
- Uninstall and reinstall mouse drivers: Completely remove the mouse drivers and reinstall them from scratch.
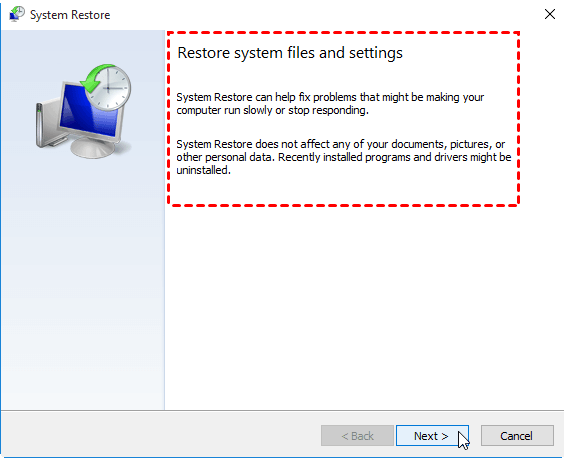
- Use System Restore: Restore your computer to a previous state where the mouse right-click was functioning correctly.
- Check for physical damage: Inspect the mouse for any physical damage or loose connections.
- Try a different mouse: Test with a different mouse to determine if the issue lies with the mouse itself.
- Perform a Windows 10 repair installation: Repair your Windows 10 installation to fix any underlying system issues.
- Contact technical support: If all else fails, reach out to the manufacturer or Microsoft support for further assistance.
Check Touchpad Settings
- Open the Start Menu by clicking on the Windows icon in the bottom left corner of the screen.
- Click on Settings (the gear icon).
- In the Settings window, click on Devices.
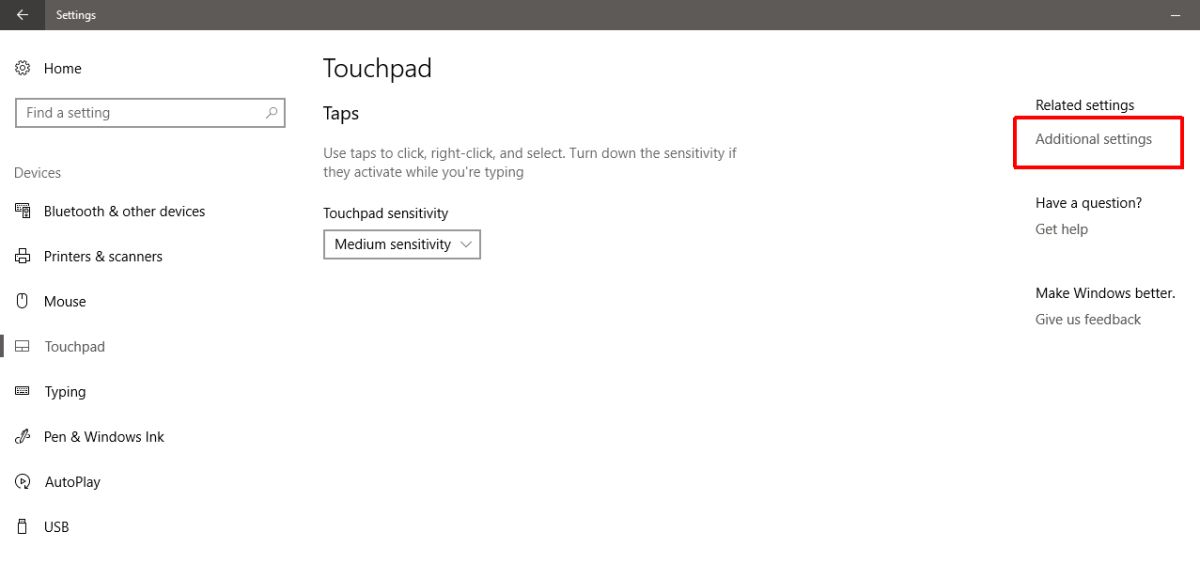
- Click on Touchpad in the left menu.
- Ensure that the Touchpad toggle switch is turned on.
- Adjust the Touchpad sensitivity slider to your preference.
- Try changing the settings under Scrolling direction and Scrolling speed to see if it resolves the issue.
- If available, click on Additional settings to access more advanced touchpad settings.
- Look for any specific options related to the right-click function on the touchpad, such as Tap with two fingers for right-click or Tap in the lower-right corner for right-click.
- Enable the appropriate option if it is disabled.
- Click Apply or OK to save the changes.
- Restart your computer to apply the new touchpad settings.
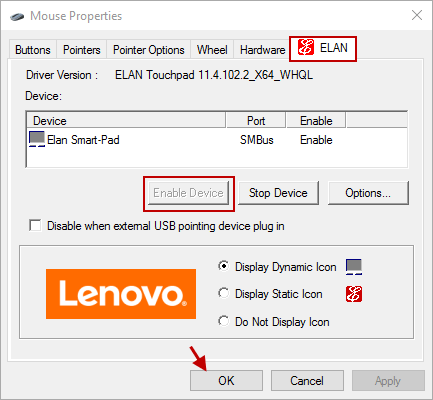
Check Mouse/Touchpad Support Software
- Open Task Manager by pressing Ctrl+Shift+Esc
- Under the Processes tab, right-click on any instances of SynTPEnh.exe or similar processes related to the touchpad
- Select End Task to close the processes
- Open the Control Panel by typing “Control Panel” in the Windows search bar and selecting the corresponding result
- In the Control Panel, search for Mouse settings or Touchpad settings
- Click on the Mouse or Touchpad tab, depending on your device
- Ensure that the Enable or Turn on option is selected
- If the option is already enabled, disable it and then re-enable it
- Click Apply and OK to save the changes
- Restart your computer and check if the right-click issue is resolved